Nectarine Pie


IMG_1132.jpg

Usually I get excited for autumn which is my favourite season above all. When it gets here I’m all about scarves, candles and apples and cool weather. I just wish it would wait a little bit longer. As much as I love autumn, I’m not quite ready for summer to be over. Particularly since I don´t feel it´s been a summer at all this year with low temperatures and lots, lots of rain. But luckily the last weeks we´ve had several days of sun and heat, and I was reminded that I’m not ready to move forward into autumn yet. I want more summer!

The good things about autumn though, is the abundance of (Norwegian) plums and apples which are my favorite fruits. On the downside, it´s the end of nectarine season, which is another favorite of mine. So the last days I`ve been buying a lot of nectarines, just in case it would be my last chance.

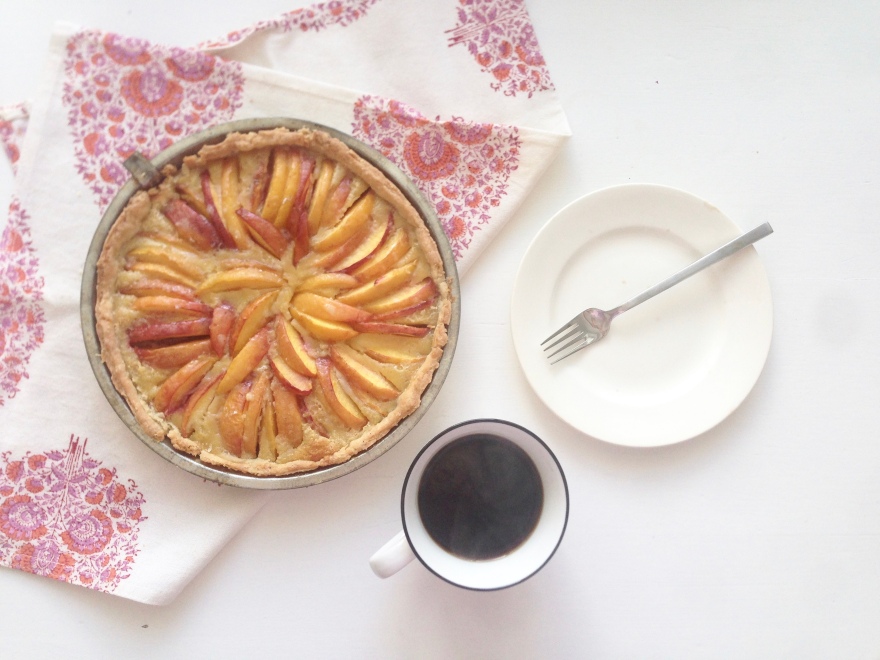
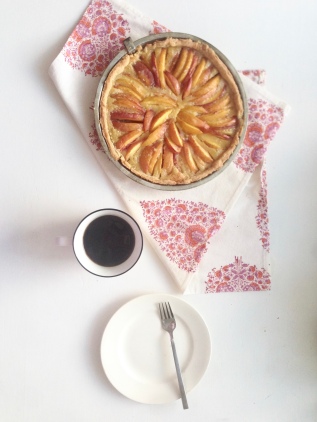
They are no longer at their peak, but still delicious, and this weekend I decided to put some of them into a pie. Before they are gone. Luckily plums will be there to fill their gap. For a while, at least. The season is way too short for stone fruits…

This nectarine pie might be my last chance to celebrate stone fruit for awhile. Be sure to make it before the nectarines have vanished for the year! Each bite of this sweet, decadent pie tastes like summer. Even if summer never was here, this pie makes it feel like it.

img_1136img_1144

Nectarine Pie

Prep time
1 hour 30 mins
Cook time
1 hour
Total time
2 hours 30 mins
Pie crust:
150 g all purpose flour
115 g cold butter
3 tbsp cold water
1/2 tsp salt

In a large bowl, combine flour and salt. Cut in butter until mixture resembles coarse crumbs. Stir in water, a tablespoon at a time, until mixture forms a ball. Wrap in plastic and refrigerate for at least 30 minutes.
Roll dough out to fit a 9 inch/22 cm pie plate. Place crust in pie plate. Press the dough evenly into the bottom and sides of the pie plate.

Filling:
4 nectarines
100 g marcipan
1 egg
50 g sugar
1 tpsp cornstarch
pinch of salt

Slice the fruit in half and remove the pits. Place the nectarines flat side down and cut into thin slices. Place the sliced nectarines in a large bowl and toss with cornstarch and half of the sugar.

In a small bowl, stir together egg, grated marcipan the rest of the sugar and salt.

Pour the filling into the pie crust.
Arrange the sliced nectarines on top of the filling in any way you like. Or don´t arrange them at all, and just toss them over. Still pretty, and equally tasty – but less fuss.
For once I took the time to make a litte effort arrenging the fruits.

Sprinkle with sugar and bake on 180 C for 40-50 minutes, or until the crust is golden and the filling is bubbly. Allow to cool completely to room temperature before slicing (the filling will thicken as it cools).

Enjoy with a dollop of creme fraiche and savour the sweet, juicy taste of summer!

Notes:
The pie was very sweet, so I think one easily reduce the amount sugar, or even omit it. The nectarines are sweet on their own, and even more so after they´re baked, and the marcipan also adds sweetness. But don´t leave out the marzipan, as it makes the filling sweet, but also buttery and creamy. So that will be at your own risk.

IMG_1127.jpg

Danish”Hindbærsnitter” – frosted raspberry pop tarts!

IMG_0532.JPG

I have tasted Hindbærsnitter twice in my life. Today, making these, and a year ago, when I made my first batch ever of Hindbærsnitter. This was embarrassingly enough also my first taste of hindbærsnitter after 5 years in Denmark, where these sweet pop-tart-looking things appear and are sold in every bakery  you go by. And lord knows I´ve been around those Danish bakeries quite often, so I´ve had several opportunities to try them out. Buuut there were always some Cinnamon-rolls or other tempting goods that got in the way, so I never really got around to it. But last summer I made a lot of raspberry marmalade, and I needed to put it to use, so I thought of the so-called Hindbærsnitter and decided to give it a go. And it was good, I tell ya… And I couldn´t help but thinking: What took me so long? Why haven’t I tasted them before?

(Well I´m not sure if this really counts: I mean, I´ve only tasted my own , never a true Danish hindbærsnitte, so for all I know, my version might be waaaay off. But I don´t think so, though. I´ve done my recipe research, so I think a Dane would approve…)

And fast forward to today, I´m where I was a year ago. I needed an excuse to keep me busy inside, as it´s pouring down outside, and to treat myself with something sweet…  After all it´s suppose to be my summer holiday, and with this weather and temperature I thought I deserved a day on the sofa, accompanied by baked goods, coffee and a good book. So I stayed inside making raspberry marmalade and went on baking Hindbærsnitter. Luckily, they came toghether quickly and without much effort, so the rest of the day could be spent relaxing enjoying the results…

Like I remembered, they were lovely. Really sweet both by their look and taste. I might have gone a little overboard with the frosting, but who cares. Days like these crave sugar…!

Hindbærsnitter

  • 250 g all purpose flour
  • 1 tsp baking powder
  • 250 g cold butter (chilled and cubed)
  • 250 g sugar
  • 1 egg
  • + about 300 g raspberry jam

Frosting

  • 400 g confectioners sugar
  • + water or lemon juice

Method

Preheat oven to 200 degrees C and line two baking sheets with parchment paper.

Make the dough: Stir together the flour, sugar, and salt. Work in the butter with your fingers, pastry blender or food processor until pea-sized lumps of butter are still visible, and the mixture holds together when you squeeze it. If you’ve used a food processor, transfer the mixture to a large bowl and add the egg. Mix just until everything is cohesive, kneading briefly on a well-floured counter if necessary.

Refrigerate for 3o minutes.

Make the tarts: Divide the dough in half, and place on a lightly floured work surface.  Roll the crusts with a rolling-pin into a size of 12×25 cm and  3-4 mm thickness.

Bake in a preheated oven until the edges are lightly golden brown, about 10 minutes. (Be sure to keep an eye on them, time depends on how thin you roll them) Allow to cool on the baking sheets.

Meanwhile, stir together the confectioners’ sugar and water/lemon juice and make a spreadable frosting. It should be quite thick. Spread one of the cooled tarts with frosting and sprinkles. (I used freezedried berries) Spread raspberry jam out on the other pastry.  Sandwich them together, the frosted pastry on top of the raspberry spread. Press them a little together if you manage, and cut into (in)appropriate sizes.

Serve once the frosting is completely set or not, if you can’t wait (like me) and like it a little soft and sticky. Now all you need is a blanket and a cup of hot beverage, and something to read, and the summer-rain can just keep coming…cause I´ve got hindbærsnitter, the perfect accompaniement on a rainy day!

IMG_0535

Rhubarb muffins

IMG_9513

Rhubarb season is finally upon us! My favorite season? At least one of my favorite vegetables! Yes – it´s a vegetable!!!

When rhubarb arrives and you see various recipes for rhubarb crumble, lemonade and muffins – it´s a sure sign of spring and a promise of summer. I might try out a new recipe each year, but I usually fall back to crumbles and this old classic: My mother´s rhubarb muffin. Mum knows what she´s doing already, so no need to change or tweak this. It´s simply perfect.

So when I visited my parents yesterday, I made a request for some rhubarb, and in my defense the saying says to pick it within midsummer which is only a few days away….So I took home a large bunch to do some baking. When my father saw me and the rhubarb he suggested the muffins. He loooves them. So do I. Actually, everyone does. So the idea was planted in my head: What better way to start rhubarb-baking-season than with a real family classic!

So, today, equitted with rhubarb, eggs, butter and apron I realized: The recipe is in my recipe book which currently is located in copenhagen! And my mother is out of town!!! What to do? Well, luckily, it´s not the only rhubarb-muffins-recipe on the planet (one of the best, perhaps) so I turned to google as I often do and found what seemed like a good replacement!

And indeed it was! Actually, in a way this is a more extravagant version of the usual…

Maybe a little less gooey, but my go-to-recipe is so gooey you need a spoon, so that´s maybe a little overexaggerated for some! 😉 Anyway – both equally delicious!

I hereby declare rhubarb-season for opened!

IMG_9534

Rhubarb muffins

Rhubarb compote/ Rabarberkompot
10 oz rhubarb / 300 g rabarbra
1/2 vanillabean/ ½ vaniljestang
2.5 oz sugar / 70 g sukker

Clean and cut the rhubarb in inch-sized chunks. Pour rhubarb, sugar and vanillaseads and bean in a pan and stir. Cook on medium heat until everything is soft and compote-looking.

Rens rabarbraen og skjær dem i skiver på 2-3 cm
Ha rabarbra, sukker, vaniljekorn og den halve tomme vaniljestang i en gryte – og rør det sammen. La rabarbraen simre ved middelvarme til de er møre og minner om en grov pure.

Muffins

3 eggs / 3 egg
6.5 oz sugar / 180 g sukker
8 oz flour / 220 g mel
2 tsp vanilla sugar / 2 tsk. vaniljesukker
1.5 tsp baking powder / 1,5 tsk. bakepulver
5 oz butter (melted) 150 g smør (smeltet)
4.5 oz marcipan finally chopped / 120 g revet marsipan

Whisk egg and sugar until creamy. Stir in the dry ingredients and the melted and cooled butter. Finally fold in the chopped marzipan. Divide the batter in muffin cups, and top with a spoonful of the rhubarb compote. If desired, sprinkle with crumble!  Bake for 20-25 minutes at 350 F.

Pisk egg og sukker til en luftig masse.
Rør alle de tørre ingredienser i og det afkjølede smør.
Vend til sist revet marsipan i muffindejen.
Fordel deigen i muffinsformer. Top med rabarbrakompott og drys en teskje crumble over.
Bag ved 180 grader i 20-25 min.

IMG_9520


Whole wheat blueberry rolls

IMG_5055

Long time no blogging. I know. Seriously a long time. And I can´t really blame life of getting in the way or something like that, as I´m ending my 2-months long summer holiday with no job, no – or very little studying and not really any good summer-weather either, “forcing” me outside… So there should have been plenty of opportunities to bake, cook and blog, but too much time makes me lazy… What can I say? The less I do, the less I….do. But now I´m back! Because I´ve really actually cooked and baked and eaten a lot of good food this summer, so I guess I ought to share some of it, and not keep it all to myself!

The last weeks, when there was several days in a row without rain (yeah, I know) I packed my blueberry-picker and went hunting. (Appearantly the picker is a somewhat Norwegian, or maybe scandinavian? thing, because it really attracts tourists!) I´ve had heard that the blueberry season was started, and some friends had already been having good luck finding berries, so I was pretty optimistic. But I have to say I was a little disappointed. There weren´t as many as previous years, and besides, they were small, but I thought to myself that a cold summer with a slow ripening process would produce even better berries, as the case is for strawberries. It wasn´t until some old ladies came along and spotted me and my picker in the woods, who also noticed the small size of the berries and claimed that they weren´t sweet, that I actually took a berry-tasting-test. I thought they might have said it to scare me off and have the berries to themselves, but they were right. The blueberries weren´t really sweet. Bummer. But I finished the surrounding blueberry bushes and started to walk home. On my way I came to talk with another guy curious about the berry situation, who asked about ripeness, size and flavour. When I said that they were pretty small and also a little sour, he said “Well, then it´s almost a complete waste of time!” And I wondered, was it? Did I spend so many hours for nothing? I would prove him wrong! These blueberries maybe aren´t the best for snacking, but put into baked goods in companionship with sugar and butter, that would probably make up for it! I made some jam right away, which was lovely, but now, it´s time to do some baking, I figured! Today I invited a friend over for coffee and something home-baked, so I figured it was a nice opportunity to use some of the berries. I finally made a decision on what to bake (my first intention was a blueberry bundt cake, eventually a pie – but as there was just the two of us, I figured it would be better with something in a serving size that also could be frozen) and landed on these blueberry rolls.

I was a little short of time, so I tweaked my single-rising yeast recipe, and adapted it to a more suitable number of rolls. I substituted most of the wheat with whole wheat, and used fresh blueberries, butter, sugar and marcipan for the filling. They turned out delicious! A little burned, but still good!

Whole wheat blueberry rolls

  • Prep time: 1 hour and 30 minutes (or more if you have the time)
  • Cooking time: 15 minutes
  • Total time: 2 hours

Ingredients – makes 12 rolls

  • 2 dl milk
  • 100 g butter
  • 100 g powered sugar (which I replaced with regular sugar)
  • 30 g fresh yeast
  • 1/2 tsp cardamom powder
  • 500 g flour (I used about 3/4 whole wheat, and 1/4 regular wheat)
  • 2 dl blueberries
  • 50 g sugar
  • 50 g butter
  • 50 g marcipan

Instructions:

Bring milk, sugar and butter to a boil in a large pan. Remove from heat and allow to cool until it reaches a lukewarm temperature. You can speed up the cooling-down process by putting the pan in the zink filled with cold water. Add the yeast into the mixture, and stir in cardamom and the flour. (If the pan isn´t big enough, simply pour the milk-mixture into another bowl, and then add the flour) Knead the dough into an elastic large ball, using your hands dusted lightly with flour. (If you have them time, put the dough in a covered bowl, and let rise in a warm place about 1 hour or until the dough has doubled in size – but the original recipe actually skips this point!)

Preheat oven to 200 degrees Celcius. Roll the risen/or unrisen dough out on a lightly floured surface, until it is approx 30×40 cm long and 1/2 cm thick. (The thinner you get it, the more area you have for filling, so that might have to be adjusted up or down accordingly if you roll it thicker or thinner)
To make filling, combine all ingredients in a bowl, mashing the berries slightly.
Spread the filling evenly over the surface of the dough.

(Whereever you go from here, is entirely up to you, whether you want to roll them like a cinnamon roll, or make them something like mine. I won´t say how I my rolls got their look, cause I did it wrong (again) and it turned out quite messy… If you´re like me, and cannot figure out the twisting, here´s an instruction video: How to twist a cinnamon-roll, or else, here´s how it goes)

Now fold a third of the dough towards the middle, and fold the other third over the first one, so you have 3 layers of dough. Cut the dough into 12-15 strips about 2 cm wide. Twist each strip until the dough stretches 20 cm long. Twist it around to shape it into a snail shell (roll) tugging the end of the dough under the roll Place the buns on a baking sheet covered with baking paper, with the twists facing upwards. Cover and let them rise to reach the double size for approximately 1 hour. Sprinkle the buns with sugar and chopped almonds. Bake them on 200 C for about 12-14 minutes or till they turn golden. Cool on a rack, or enjoy immediately, when they´re still warm and the filling is gooey…

Perfect to break apart and eat it bit by bit, making room for a zip of black coffee in between the bites! I love to eat them like that, getting a feeling of all the different textures and flavors. And the berries were perfect in these rolls! The buns turned out sweet and buttery, hearthy and filling because of the whole wheat, and the marcipan gave a lovely almondy flavour! I knew the berry picking wasn´t a waste!

Cottage cheese-apple-pancakes

Pancakes are back! Well, where they ever really out? Nahhh, not really. Just took a break after a pancake overdose some time ago. And ironically enough, a holiday in the US, consuming a lot of breakfast-pancakes, was what made me want more! I had a lot of pancakes over there… When I´m in the states (sounds as if I go there regularly – but frankly, this is just my second visit! But I´ll be back, for sure! Love it!) I try to eat as american as possible, and by american I mean all the classic american stuff. And of course local specialites. Well, I try to do this whereever I go. When in Rome, right? (And when I actually was in Rome this summer, I indulged in risotto, pizzas, gelato….need I say more? But that´s another story!) So – I was in the states, and breakfast was not included in our hotel, so we went out for breakfast each day. And pancakes were always appealing to me – speaking to me – choose me, choose me! So I did. Over and over again. By the end of our holiday, I´ve had my decent pancake-share- Some really great, some mediocre pancakes, but most importantly, I remembered how tasty a pancake-breakfast can be. So, one week later, my jetlag was more or less gone, it was weekend, and my pancake cravings began. I gave in. Though, not the typical american classic kind. I tried to make them a little healthier, non-US-style! (But then again, I´m no longer in America, but in healthy whole-grain scandinavia, surrounded by health-freaks from my study. So I adapt, once again!) I bought some cottage cheese for some reason (I never eat it) and decided to use some of it for pancakes. Since I didn´t have blueberries or bananas and was to lazy to get out, and I was beginning to get a cold as a result from 10 days in Miami, and then back to cold Denmark, I had to make them without fruit or use what I had. I had half an apple, and decided to use that. Grated it into the batter. And then I was ready to make some pancakes! They turned out really moist because of the apple and cottage cheese, though the texture was a little different then the usual pancake. I also made them whole grain to make them a little healthier. And then I drenched them in butter and syrup….. Next time, I think I´ll go for the real thing though! But as a less-guilt-free pancake this is really good! And moist!
After a little research online, I had a certain idea of a recipe, and mine went something like this:

Cottage cheese-apple pancakes (about 10)

1/2 cup cottage cheese
1 egg
1 tsp vanilla extract
1 tbsp syrup (I used agave, but maple or honey will do!)
½ cup all purpose flour
¼ cup whole wheat flour
1 tsp baking powder
Butter/oil for frying.

Puree the cottage cheese and eggs in a food processor for about 30 seconds. Add in the dry ingredients, then and pulse just until combined, and stir in the grated apple.

Preheat a griddle, skillet, or any flat bottomed pan on medium/low heat.

*The pancakes need to be cooked on a lower heat for a little longer than normal pancakes.

Add some butter to the pan if you’re pan isn’t non stick. If it is, you probably won’t need any addition butter to prevent sticking. Scoop the pancakes onto the preheated griddle and use the back of the scoop to spread the pancakes a bit. Cook for about 4 minutes per side.

*The outside of the pancakes will be a deep golden brown when they’re done, not a light golden brown. Serve with syrup and butter, bananas, berries or whatever you fancy!

Tomato salad

There were tomato days in the supermarket the other day. Meaning, they offered more than one kind, and other colours than red. OMG, they do really exist! Yellow, orange and green tomatoes – totally crazy…! Well, not really, but around here, that stuff don´t come around to often. Tomatoes is a neglected buisness in Scandinavia, but it´s slowly improving. But of course, the climate does set certain limits… The season is short, and imported tomatoes are picked before they are ripe, and end up here, tasteless and boring. I know I´ve made my tomato complains before in this previous post, BUT, like I said, tomato days! Many kinds! I had to buy a bag of course. Didn´t know what to do with them initally, but I quickly found out. Tomato heirloom salad is obviously a hit at tastespotting at the moment! And the pictures of that salad really looked good. Really good. And I don´t really know what a heirloom salad is (or what heirloom means for that matter), but I knew what I needed to know: I was gonna make a heirloomish tomato salad. Or at least a tomato salad. Since I was planning this for supper, I needed some more ingredients besides tomatoes. Red onion. I think that´s allowed. Heirloom wise. And basil, of course. And some kind of lettuce. Hmmm, what else could I put into this… Google time! And then I found a recipe for heirloom salad at one of my favourite blogs 101.cookbooks, where Heidi roasted half of the tomatoes. And since I´ve tried her recipe for oven roasted tomatoes before in this delcious pasta dish, I knew this would be good. So off I went to get some rather dull, bigger tomatoes to go into the oven. The other ones, were cherry tomatoes in different colours and shapes, so I wasn´t going to do anything to those pretty little things! And what can I say. It was good. It was very good. And simple. And so perfect for today, which was a very summerly day in september. I spent the afternoon walking around the lakes, meeting up for a friend for some ice cream in the sun, talking, laughing and returning home for a light dinner. A heirloomy tomato salad-dinner with home made sour dough bread. Perfect end to a perfect day.

Heirloom Tomato Salad a la Malin – for 1
400 g tomatoes

A handful of torn lettuce leaves

1/2 Red onion

Olive oil

1 teaspoon of sugar

Sea salt and fresh pepper

Optional: Cheese of choice, like mozzarella or ricotta for instance. I guess feta would work too.

(Ok, I realize this is hardly a recipe, and instructions are hardly needed, but here we go!)

First, turn the oven to 180 C (375 F)

Cut half of the tomatoes, and toss them with olive oil, and sprinkle with salt and sugar.Toss the tomatoes you will be roasting gently (but well) in a bowl along with the olive oil, sugar, and salt. Arrange them in a single layer, cut side up, on a rimmed baking sheet. Bake, without stirring, until the tomatoes shrink a bit and start to caramelize around the edges, 45 to 60 minutes. Set aside to cool.

Tear up the lettuce, cut the rest of the tomatoes and the onion, and toss everything together. Mix in the roasted tomatoes, eventually the chunks of cheese and drizzle with olive oil. Season with salt and pepper after taste. Serve with good bread and butter.

Red pesto pasta with slow-roasted tomatoes

Wow. Why haven´t I made oven-roasted tomatoes before? That´s the question. Holy tomato, that stuff is good! And what a perfect way to turn dull tomatoes into deliciousness. And dull tomatoes are, unfortunately, the rule rather than the exception around here. Of course you can get your hands on some tomatoes that taste at least of something, but they are a little pricey, as most good things are. Actually, I don´t mind paying for quality, when it comes to food (that´s where I really don´t compromise – life´s just too short not to enjoy good food!) but it´s nice to know there´s an opportunity to make something tasty of the cheap stuff too! Especially for a poor student like myself.

I bought some tomatoes last week – more than I could possibly consume before they would start turning into raisin-like creatures. But I feared not! Because I had great intentions for these babies! Fresh or not – it didn´t matter, because they were going to be roasted – shrunken in size but maximized in flavour! (I didn´t know that at the time, but so I´ve had heard. And that´s pretty much the thing with everything: time equals flavour! I mean, just think of cheeses, wine, parma ham, sourdough….it´s the umami that developes. Umami is the fifth flavour, described as a rich savory meat-bouillon-like taste. Umami exists naturally in tomatoes, but roasting the tomatoes intensifies the flavour to the maximum!) And that´s the magic here! Turning tasteless tomatoes into taste-explotion! Allright, let´s get down to buisness:

Like I said, these tomatoes were bought not only with a particular purpose in mind, but with a particular recipe in mind, too. I had read about oven-roasted tomatoes at the Norwegian blog veganmisjonen.com, and the pictures left me drooling and craving wanting to try this! And I don´t know if I searched for a recipe, or if it just appeared, either way, it was perfect! I found it at one of my favourite blogs 101.cookbooks, and like most of Heidis recipes, this sounded and looked delicious. In her recipe she makes her own pesto, which probably is better, but I had a jar I had to finish. And I don´t have a blender. And this wasn´t about pesto. This was about roasting tomatoes. One thing at a time.


Pasta with red pesto and slow-roasted tomatoes (recipe adapted from 101.cookbooks.com)
Serves 1

80 g whole grain pasta
Red pesto
5-6 sundried tomatoes
12-15 cherry tomatoes
A few slices of red onion
1 teaspoon sugar
A handful spinach
5-6 walnuts
Feta cheese
3 tbs Xtra virgin olive oil

Directions:
Cut the tomatoes in half, and arrange them in an oven-proof pan, hollow side up. Sprinkle with sugar. Roast for 1,5 hours on 160 C (320 F) – starting with a cold oven! (Turn on the oven as you put them in!)
When the tomatoes have shrunken, splash over a decent amount of olive oil, and sprinkle with salt and pepper. Turn up the oven to 225 C/440 F, and roast them for another 5-10 minutes, until they have a slightly grilled look. But keep an eye on them, you don´t want them to be burned after waiting patiently for them for all this time!)

(Eventually – if you´re in a hurry – you can do the speedy version and bake them for 40 minutes on 200 C/400 F)

Coarsely chop the walnuts, and give them a roast on the pan. (Or in the oven I guess! It´s already turned on) Cut some fine slices of red onion, and some bigger slices of sun-dried tomatoes.
Cook the pasta – al dente, of course, and mix with red pesto, onion and sun-dried tomatoes.

Arrange the spinach on a platter, and toss over the pasta. Pour over the oven roasted tomatoes – making sure you get all the juices where all the flavour lies, and sprinkle with walnuts and crumbled feta.
Enjoy! Trust me – you will!

Roasted butternut squash with bulgur and chickpeas – and a yoghurt-cumin dressing!

This was my first encounter with butternut squash. The first date. The make or break. First impression is everything, right? Pumpkins, hokkaidos and butternutsquash(es?) are not regular guests in Norwegian supermarkets. Actually, have I ever seen either one? Well, yeah…I have, now that I come to think about it. Around halloween it´s possible to get your hands on a pumpkin in the bigger supermarkets, but I think that´s pretty much it. And that´s just the last couple of years. Every time some new food arrives, I get very eager to try it. Especially with fruits and vegetables. I don´t wanna miss out on anygthing! What if that weird-looking/ weird-named thing is the new apple? OMG! There´s no time to loose! Even so, I yet have to try a regular pumpkin. They´re so expensive, and like I said, only available during halloween… But now that I´ve moved to Denmark, it´s another story. Vegetables are cheap, and in abundance all year round! Even pumpkins! But the thing is, I´m living alone here, and the pumpkins are too gigantic for one person and my mini-fridge, so I´ve put that on hold. And that´s where the butternut squash comes in! I saw my roomie bake this thing (which I didn´t even know what was), but I imagined it would be really good. So a few days later, I went out to get what appeared to be something called butternut squash. Okeydoke. So far so good. Now – what to do with this thing? I wanted to roast it, and after some googling around the net, I found a tasty-looking recipe from this lovely blog. I replaced the farro with bulgur, but apart from that, I followed it precisely. And what can I say? What a vegetable! So sweet, so nicely coloured and totally perfect in this dish! I´ve already made it about 5 times! So off you go! Whether you´re well acquainted with butternut squash or not, give this recipe a go! It tasty, yummy and makes you feel all good inside.

Roasted butternut squash with bulgur and chickpeas (recipe from thevintagemixer.com)

Ingredients

1 tablespoon cumin seeds
1 cup plain Greek yogurt
2 1/2 tablespoons (or more) fresh lemon juice
3 garlic cloves; 1 minced, 2 thinly sliced
Nonstick vegetable oil spray
4 cups 1/2-inch cubes peeled butternut squash
4 tablespoons olive oil, divided
2 cups bulgur
2 tablespoons chopped chili
3/4 cup 1/2-inch cubes red onion plus 1/4 cup thinly sliced
1 15-ounce can garbanzo beans (chickpeas), drained
1/2 cup fresh cilantro leaves
Extra-virgin olive oil

Instructions

Toast cumin seeds in small skillet over medium heat until fragrant and beginning to smoke, 4 to 5 minutes. Cool; grind in spice grinder. Transfer 1 1/2 teaspoons cumin to small bowl. Mix in yogurt, 1 tablespoon lemon juice, and minced garlic. Season with salt and pepper. Cover and chill.
Preheat oven to 400°F. (200 C) Coat large rimmed baking sheet with nonstick spray. Place squash in large bowl. Add 2 tablespoons oil; toss to coat. Spread squash out on sheet. Sprinkle with salt and pepper. Roast until tender, about 25 minutes.

Meanwhile, cook bulgur in large pot of boiling salted water until tender, about 5 minutes. Heat remaining 2 tablespoons oil in heavy large skillet over medium-high heat. Add sliced garlic and 1 tablespoon chile; sauté 1 minute. Add onion cubes and garbanzo beans; sauté 1 minute. Add roasted squash and cooked farro and toss to blend. Sprinkle with 1 1/2 teaspoons ground cumin and 1 1/2 tablespoons lemon juice; toss to blend. Season to taste with salt, pepper, and more lemon juice, if desired.

Mound farro mixture on 4 plates. Spoon yogurt mixture over. Sprinkle with cilantro, sliced onion, and remaining chile. Drizzle with extra-virgin olive oil and serve.

Blueberry scones

It´s easter!
That means I´m home back in Bergen, I have some time to kill while everyone´s at work, and later I have some more time because of the holidays which is perfect for some staying in-activities, such as baking. And, I have people to feed, plus room in the freezer for whatever leftovers there might be! Oh, the opportunities! And not to mention, I have a lot of stuff, like berries, in the freezer, so I don´t have to get out buying overpriced supermarket-berries. Or getting wet. And like I said, it´s easter, which means some easter-treats has to be made. Only in case the easter bunny doesn´t show up, of course.

Today is a perfect day for baking. The rain is pouring down, the shops are closed, and although my boyfriend was supposed to start his holidays today, he had to arrange a quick meeting in a café. How rude! Taking clients to cafés instead of me – on our holiday! Well, there´s only one thing to do. If I can´t come to the café, the café must come to me. Which is actually a better option in this weather. Now I only had to choose a café-like snack. Like always I´ve done some baking-research before I got home. The list of recipes to try, I´ve realised is a never-ending project, as people like myself keep adding tempting recipes, and I keep both buying and borrowing cookbooks. I don´t make it easy for myself. So many recipes, so little time! And the fact that I´m on a daily search for recipes – without any other reason than just for the sake of it – well, I better get baking!

Starting with this scone recipe. These scones immediately made it to the top of my baking list, pushing down brownies, pound cake and other things that have been lined up for quite some time – poor things. But sometimes, you see a picture of something so appealing, you can´t get your mind around anything else, and there´s only one thing to do. Bake it. Get it out of the system. See if they taste as good as they looked at the picture. And of course, compare yours to the original. Uglier, prettier? It´s usually the first. But these turned out quite decent, if I may say so.

Taste wise – well, I don´t have anything to compare with, but I thought they were pretty darn good! The recipe calls for partly whole wheat flour, which I substituted for rye flour. (That´s what I had) That made them more filling and hearty, without feeling overly “healthified”. They´re still sweet and moist, but just perfectly balanced. You could easily have these for breakfast – or any other time of the day!
I enjoyed mine fresh from the oven with a cup of tea for a late lunch. I couldn´t resist adding some butter (can I ever?) – butter melting into warm baked goods – seriously, how can anyone resist?
Even so, they are flavourful enough on their own, so they don´t necessarily need anything. But I imagine a dollop of whipped cream wouldn´t hurt either. So you can dress it up or down, and serve it as breakfast, afternoon snack or dessert! Or all of the above. Go crazy!


Berry Almond Scones
(slightly adapted from thevintagemixer)

1 stick (8 tbsp)butter, cold, plus 1 Tb melted
1 cup frozen blueberries
1/4 cup sliced almonds
½ cup milk
½ cup Greek yogurt
1 cup all-purpose flour, plus more for dusting the work surface
1 cup whole wheat/rye pastry flour
½ cup sugar, plus extra for sprinkling
2 tsp. baking powder
¼ tsp. baking soda
½ tsp. salt

Instructions

Yields 8 generous blues-killing scones
Adjust an oven rack to middle position and preheat to 220 C/ 425˚ F.
Grate the frozen butter on the holes of a large box grater.
Whisk together the milk and Greek yogurt in a medium bowl; refrigerate until needed. In another bowl, combine the flour, ½ cup sugar, baking powder, baking soda, salt and almonds in a medium mixing bowl. Whisk to combine. Add the grated butter to the flour mixture and toss with fingers until thoroughly coated.

Add the milk-yogurt mixture to the dry ingredients and fold with a spatula just until combined. Transfer the dough to a generously floured work surface. Dust the top of the dough with flour, and knead with well floured hands, 6-8 times. Add small amounts of flour as needed to prevent sticking.
Roll the dough into a 12-inch square.

Sprinkle the berries evenly over the surface of the dough, and gently press down so that they are slightly embedded in the dough surface. Fold up the edges of the dough up so that all of the berries are concealed inside the dough. The dough should resemble a ball. Flatten the dough and gently form into a circle (about 7 inches by 7 inches). Using a sharp, floured knife, or a sharp dough scraper/chopper cut the circle into 8 equal triangles (like pie wedges). Transfer to a parchment lined baking sheet. Brush the tops of the scones with melted butter and sprinkle lightly with sugar or more sliced almonds. Bake until the tops and bottoms are golden brown, 18-25 minutes. Transfer to a wire rack and let cool at 10 minutes before serving. If you can wait that long!

Corn salad

I can´t believe summer is very soon to be over. Both my summer holiday and the season. I´ve had 2 months of holiday, just lazing. This has been such a lazy summer. You have no idea. I didn´t even bother to blog, although the only thing I´ve done these past weeks is cooking, baking and eating. It seems to me that I get lazier the more time I have on my hands, and the fewer things I have to do, which eventually probably will make me totally incapaple of doing anything at all. Well, I guess it´s a good thing there´s less than a week left until I start my studies again.

Today was such a beautiful day. The sun was shining and you could feel it warming your skin, though the sun is loosing to the sharp air as every day goes by. But not today. I spent it walking to the mountains, picking some blueberries along the way, reading in the park and eating ice cream. It was hot. It called for barbecueing, but I knew it would be too cold for that when my boyfriend would be back from work. So I decided to throw a little inside-barbecue for us. I had some aubergines and sausages as my base. I drizzled the aubergines with oil, salt and pepper, and roasted them in the oven together with the sausages. Now I needed some accompaniements. A kind of salad. I found some ears of corn in the fridge, probably from the last time we barbecued. Whenever that was. I wanted to use them, but I didn´t know in which way. Luckily I remembered to have seen a post about a corn salad on bloglovin that I had yet to read. So I read it, and that was my solution. It was quite summerly, just like I wanted this dinner to be, and it paired up very well with the aubergines and sausages. The recipe is from 101.cookbooks.com.
I added some little gem lettuce, for some colour and crunch and to make it a little lighter. It worked out very well, and my boyfriend, who is not exactly salad-man himself, absolutely loved it and came back for seconds. (Usually he just puts some on the plate, and that´s where it stays. For me to see and for him to avoid…) I also made the dressing to go with the salad, but I think the salad also can be served without. The dressing was that little extra something, though. So I guess I´m saying make it. Unless you don´t bother. Whatever.

But make this at least!

Corn Salad for 2
(recipe adapted from 101.cookbooks)

2 ears of corn
1/2 red onion
50 g roasted pepitas
50 g roasted sunflowerkernels
1/2 little gem lettuce

Dressing
2 tablespoon extra virgin olive oil
1 teaspoon brown sugar
a squeeze of lemon juice
salt and pepper to taste

Use a knife and cut the kernels from the cobs. Finely chop the onion. Put it in a bowl together with the kernels while you make the dressing.

Combine lemon juice, salt and sugar in a bowl. Gradually add the oil, whisking vigorously until everything comes together. (Ooops, I see where I went wrong…I just put everything in a cup and stirred like crazy… Well, don´t be like me!) Adjust to your taste, but this dressing is ment to be on the sweet side.

Just before serving add the seeds to the bowl of corn, together with 2/3 of the dressing. Toss well and make everything well coated. If you want more dressing, add to your taste, or serve it on the side.